
Matching Tile Size to Your Room's Shape
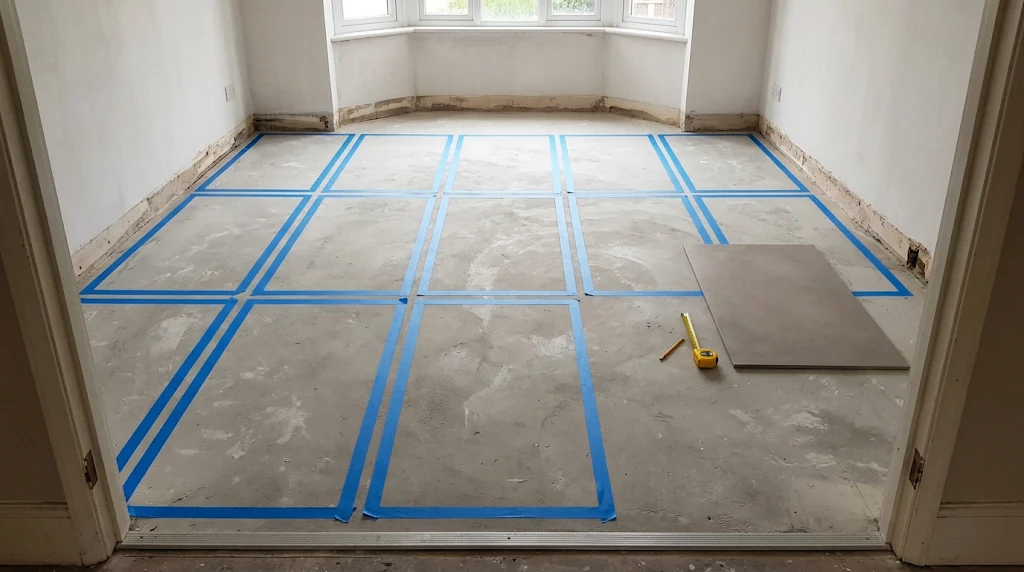
A 600 × 1,200 mm tile can look perfectly at home on the showroom display and still leave an awkward band of flooring along your living room wall. Rotate that same tile 90 degrees, or shift the starting line, and the cuts fall in entirely different places. Sketching the layout before you commit to a size keeps the problem from surfacing on installation day.
The right choice gives balanced cuts along the edges you notice, follows the floor's outline, and works around doorways, drains, and fixed features. Start with the length and width of the area you will really tile, not the room's overall footprint alone. Plot a few rows in each direction, then check what meets each wall. Small changes in the starting line can move a cut by half a tile.
Think of the sketch as a dry run. Nothing has been cut or fixed, so any flaw shows up on paper first. Even a rough plan can expose a narrow strip you would rather not live with. Time spent now saves adjustment work once adhesive is down.
Orientation matters as much as nominal size. The same piece can produce a calm floor or a crowded field of joints simply by turning it. Let the room's dimensions and the lines you want to see drive the decision. Neither choice should be made in isolation from the other.
Measure the floor you plan to tile
Record the room's length and width in millimetres. Measure each span in more than one place, especially in an older home where walls rarely sit square. If one end of the room reads 3,100 mm and the other 3,075 mm, the cut along that wall will taper. A broad edge piece makes the discrepancy far less noticeable than a thin strip.
Note every doorway, column, boxed-in pipe, and change in floor finish on the plan. For an L-shaped room, draw both sections on one sheet so grout lines appear to carry through. In a kitchen, confirm whether the tiles will run beneath the cabinets. That visible band between the cabinet fronts matters because you pass it every day.
Sketch the obstacles before you head to the tile shop, so each option can be tested against a real layout. Take the plan with you rather than relying on memory, since dimensions blur once several rooms are in play. Square metres tell you how much floor to cover; individual measurements tell you what will fit.
A 2 × 6 m hallway and a 3 × 4 m room both total 12 square metres. Their grids, however, meet the walls in very different places. Overall area alone never predicts how the finished floor will read. The drawing shows the pattern; the numbers confirm it fits.
Work out the cuts before you choose
Suppose the living room measures 3,100 mm wide and 4,400 mm long. Across the width, five full 600 mm tiles consume 3,000 mm. Centre that run and strips of roughly 50 mm remain at each wall. Shift the grid so four full tiles sit between two cut pieces, and every edge grows to about 350 mm.
Three full 800 mm tiles across the same span also leave approximately 350 mm at each side. Two tiles set with their 1,200 mm edge across the room produce a similar result. These figures use the sizes printed on the label and ignore grout joints and perimeter gaps for a quick first sketch.
A 350 mm cut reads differently from one tile to the next. It exceeds half the width of a 600 mm piece but falls short of a third of a 1,200 mm one. Draw the grout lines along with the outer edges so proportions are easy to judge. Installation guidance generally favours a balanced layout and cuts of at least half a tile where practical.
Doorways deserve attention of their own. A threshold sitting slightly off centre can make an otherwise balanced grid feel lopsided from the hall. Mark every opening before you fix the starting row.
When comparing large format tiles for this room, repeat the exercise along the 4,400 mm length. Running the 1,200 mm side that way leaves roughly 400 mm at each end after three full tiles. Check where the nearest grout line falls against any wide doorway. Adjusting the starting line on paper costs nothing once the first row is down.
Let the room's shape guide the direction
A square tile such as 600 × 600 mm or 800 × 800 mm creates a grid that reads the same from every side. That can suit a nearly square living room or an open space entered from several directions. In an open-plan living and dining area, check whether one grid can continue through both zones. Watch for thin strips beside a kitchen island or at a balcony door.
Rectangular pieces add a further choice. In a galley kitchen, laying the long side parallel to the cabinets emphasises the length of the aisle. Turning the tiles across that axis draws the eye from one counter to the other. Try both directions on the plan, then stand in the doorway and judge the view.
Carry one direction through adjoining spaces wherever you can. Switching orientation at a threshold can look deliberate, but an accidental half-tile shift rarely does. Decide the pattern for the whole visible area at once. Where two zones meet, a clean joint line beats a near-miss every time.
One orientation may leave a broad cut along the cabinet fronts, while the other puts a grout line close enough to form a sliver. Before visiting the tile shop, decide whether a staggered pattern appeals at all. If it does, sketch two or three rows, since the starting cut changes each time. With long rectangles, the offset chosen affects how obvious height differences become between adjoining edges.
Plan around drains and other floor breaks
A compact room can accept a large tile when the floor is fairly open and the cuts land well. A bathroom of the same size might hold a toilet, a vanity, a shower screen, and a drain within a few square metres. Sketch every fixture before you commit to a layout. The relationship between joints and edges becomes obvious only once they are drawn.
A grout line passing just outside the shower screen can look deliberate; one that clips a corner rarely does. Shift the starting line by a few centimetres and the wet area may read more cleanly. Check the same thing where a basin or toilet sits close to a wall.
Inside the shower, the slope of the floor may settle the size question. A surface that pitches toward a point drain in several directions often needs smaller tiles, or angled cuts through larger pieces. A suitably positioned linear drain allows the floor to fall one way, which can make broader pieces easier to lay. Have the installer confirm the drain position and gradient before you order shower floor tiles.
When weighing large format tiles for a wet area, remember that cuts around a drain can consume most of a piece. The visible remnant may be small even when the offcut is substantial. Plan those junctions early so the grid reads cleanly across the main floor. Working the wet area into the main layout early prevents a rushed decision later.
Confirm the real tile size before ordering
Ask for the actual face dimensions of each tile, the recommended grout joint, and any pattern guidance. The number printed on the label is only the nominal size. Face measurement and joint width together determine where every row finishes, a detail that matters most with large format tiles. Once you have those figures, have the installer check the layout with perimeter gaps included.
A few millimetres across several joints can matter when a cut is already tight. Bring your plan to the tile shop so the figures can be confirmed against available stock. For larger pieces, check that they can pass through the doors, stairs, or lift serving the room. Ask the installer to assess floor flatness too, since an uneven surface must be corrected first.
Preparation work can affect the effort and materials a job requires. Quantity should be estimated from the final layout, then increased for cuts and spares. A cut around a column or drain may use most of a tile, even when the visible piece is small. Waste like that is normal, but it should be counted before the order goes in.
Comparing two sizes side by side under the room's own light also helps. Colour, finish, and joint width all shift how busy a floor appears. Judge them where they will be laid, not against a showroom wall.
When two sizes still seem equally suitable, mark outlines on the floor with painter's tape. Include the first row at the doorway and a cut along the most visible wall. Stand where you normally enter and study the result from that angle. That single view will help you settle on the size and orientation you can live with.

 English
 Arabic
 French
 Spanish
 Deutsch
 Turkish
 Dutch
 Italiano
 Russian
 Romaian
 Portuguese (Brazil)
 Greek